
DEPLOYMENT
This section addresses various aspects of Pipeline Classic deployment. See Pipeline Flex page for the Flex
CONTENTS
Where to place the device delivery catheter?
Unsheathing Distal Delivery Wire
Exposing Initial Segment of Device
Post-Deployment — postprocessing
Distal Stenosis post Capture Coil Detachment
A note of disclaimer can’t be avoided here — as you all know, at the present time, for 10 Pipeline operators there are 20 opinions on how to deploy it. Such a state is true of all techniques, particularly new ones. What follows is our way, from technical and strategic viewpoints. I can only say that it works very well for us.
A movie of smooth deployment is shown below by way of introduction:
Case selection factors — some helpful notes to keep in mind:
a) if the landing zone is larger than 5.25 mm diameter, a larger diameter stent such as a 6 mm Solitaire FR, Precise, Wallstent, or a carefully delivered covered stent can be used to tack down a pipeline to the larger wall, however this may increase the risk of endoleak if an uncovered, relatively high porosity stent is chosen for the mission. Unless a covered stent is utilized, using the Pipeline where the landing zone is larger than the device is not a good idea.
b) previously stented cases are associated with both catheterization issues and reduced cure efficacy. Pre-existing stents such as Enterprise of Neuroform frequently do not appose the walls of the recipient artery along their entire lengths, especially around curves, where struts of indwelling stents protrude into the parent vessel. In these cases, the guidewire may have difficulty finding the “true” lumen; getting through interstices instead of the true lumen will lead to device constriction during delivery. When indwelling stents are not completely apposed to the vessel wall (the majority are of this kind), neither will be the Pipeline deployed within them, which increases risk of endoleak and interferes with endothelial coverage. If you choose to proceed, it may be useful to extend the landing zones beyond both ends of the pre-existing stent, so that the entire segment may be conceptualized as a “fusiform” aneurysm with no native wall support. Crossing the indwelling stent with a J-wire configuration helps prevent the wire from getting into cell interstices and makes it more likely that the wire will the “true” lumen
c) perforators occasionally do come from the aneurysm itself, particularly in the posterior fossa; this is a different situation from covering perforators which are immediately apposed by the device. Vessels coming from aneurysm dome in all likelihood will either go down with the aneurysm when it thromboses, or will keep the aneurysm open. Occasionally, collaterals are impressive enough to backfill the vessel arising from the aneurysm (or covered by the Pipeline) all the way to the ostium, as seen in this movie, case courtesy of Dr. Howard A. Riina
The ophthalmic artery is likely to be one most often covered by the Pipeline. About 20% of covered ophthalmics in our experience are closed on a 6 months follow up angiogram. All are asymptomatic (except one case of questionable momentary amaurosis); the ECA takes over the vessel.
Proximal support
The more support, the better. The device is astonishingly flexible, however maximal support greatly simplifies deployment, especially with more distal lesions. Distal support catheters are quite good now, and the further they can be safely advanced the better. It is sometimes best to park one in a safe relatively proximal location and advance it later over the delivery microcatheter. Our typical systems are tri-axial: 6F Shuttle Sheath, Navien 058, and Marksman. If one wishes to jail a coiling catheter to deploy the Pipeline and subsequently coil, there are a number of options if using a bi-axial system, and several for the tri-axial system, such as:
1) NeuronMax, Navien 058, and Marksman. A small profile coil catheter can go between the NeuronMax and the Navien.
2) 6F Shuttle Sheath, 4.3 DAC, and Marksman. A small profile coil catheter can go between the NeuronMax and the DAC. The fit between the DAC and the Marksman is rather tight.
There are other possible solutions. The important point is to err on the side of more support. Beware of skipping the distal support catheter unless you are an experienced user. For the posterior fossa, we typically use a short Shuttle (80 cm) in the subclavian, with a Navien 058 or Neuron 053 as high up the vert as safely possible. The DAC and Penumbra family of catheters are also very reasonable choices.
3. Most groups use an .014 guidewire inside a Marksman or another .027 catheter, which will of course accommodate an additional .010 buddy wire, and this can be very helpful on occasion. Large-Giant aneurysms will frequently require loop-to-loop catheterization. An .018 wire, such as the double-angle Terumo can be very useful also.
Reducing the loop following successful distal access is usually a good idea.
The device will likely want to prop itself against the posterior dome of the aneurysm as it is delivered, such that one might need a greater device length than anticipated even if one is planning to bridge the neck with a single device.
Where to place the device delivery catheter?
May be a rather obvious choice, but some considerations are useful on occasion. One needs to be at minimum 15 mm from the intended distal landing zone, which is the length of the leading guidewire that cannot be directed until the device detaches from the capture coil. It is generally better to place the delivery catheter further. For cavernous aneurysms, M1 is a good place; paraophthalmic or more distal lesions will require an M2. All unfavorable factors — tortuous path, larger aneurysm, “bad” arch — should increase the length of delivery catheter safety. On the other hand, a too-distal catheterization, as may be called for by “popping off” the device distal to its intended landing zone, is associated with its own hazards. Choose either the largest branch or one with least angulation relative to the M1. Minimizing angulation is especially desirable for more distal deployments, where the artery is not anchored (as the siphon is) and in fact will likely be displaced by the Pipeline, as the video below shows:
While the primary operator or operators deploy the device, an assistant should keep an eye on the leading guidewire vis-a-vis perforators and kinks. There is not much to be done about it prior to capture coil detachment, however afterward the wire can be manipulated into a better position. To this end, it is a good idea for one of the biplane views to be selected such that the expected position of the leading guidewire zone is well-seen. Here, the guidewire drops into the anterior temporal branch, and is repositioned following device detachment from the capture coil.
Unsheathing vs. pushing
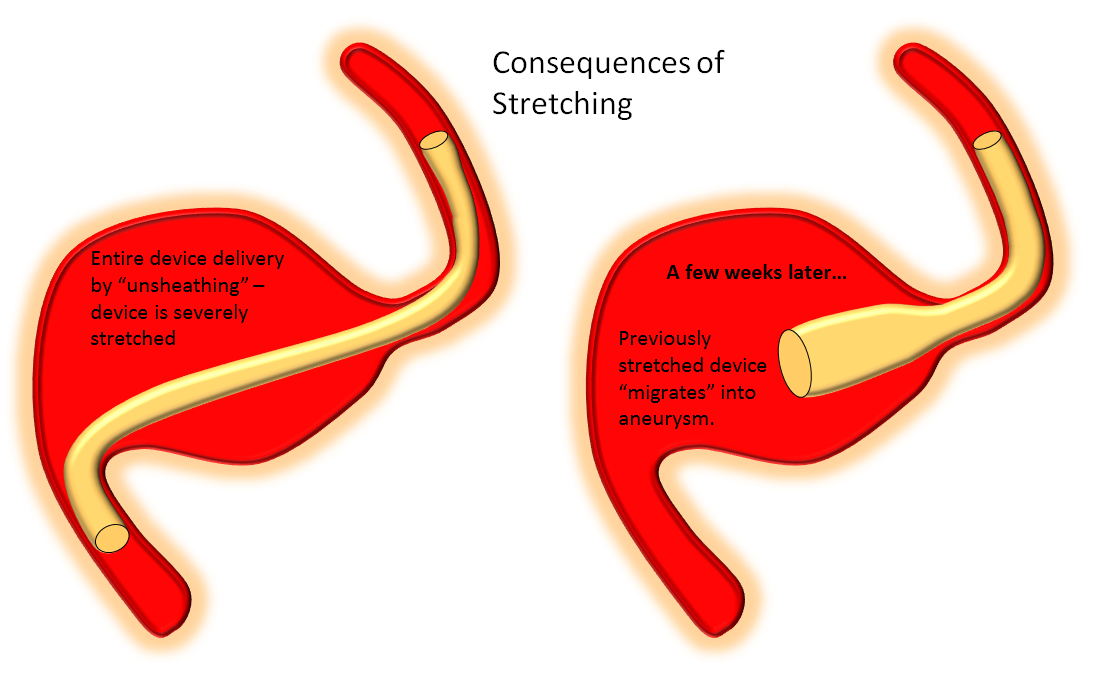
In contrast to laser-cut devices such as the Neuroform and Enterprise, which are constrained within their delivery sheaths by collapsing the stent to its minimal diameter and maintain their lengths on expansion, the Pipeline is loaded into the delivery system by the action of elongation to about 2-2.5 times the indicated size. Therefore, its deployment requires expansion and foreshortening, and pushing the device out facilitates expansion. On the other hand, unsheathing simply uncovers the pre-stretched device without allowing it to expand to its desired diameter. Thus, predominant unsheathing, which is the appropriate for delivery of laser-cut stents, is NOT the right action for delivery of the Pipeline. Devices deployed in this fashion are ALWAYS stretched, and therefore have a tendency to foreshorten with time, in some cases enough to entirely come off the landing zone and prolapse into the aneurysm, and generating reports of delayed device “migration”.
One common scenario where tendency for unsheathing is particularly tempting is when one wishes to bridge a long neck with a single device, which leads particularly to stretching of the proximal end. The device will tend to foreshorten in time, either immediately or in delayed fashion after the procedure, and may on subsequent imaging (or following an unfortunate clinical change) be found to have “migrated”. In fact, the device simply behaved according to its geometric and physical properties. Below is an illustration of what happens under such circumstances.
A movie of a similar situation is shown here, case courtesy of Dr. Howard A. Riina:
Positioning the Device
Once the delivery catheter is appropriately positioned and working angle roadmaps are obtained, the device is advanced within the delivery catheter until it reaches the desired distal deployment location. The device will spring back somewhat following its release from the capture coil (it opens and foreshortens) and therefore you may want to advance the capture coil a bit past where the edge of the device should ultimately oppose the wall. For example, if you wish to just miss the PCOM ostium so as to leave it completely uncovered, you could nevertheless position the capture coil partially over the ostium, knowing that the distal device edge will recoil anyway.
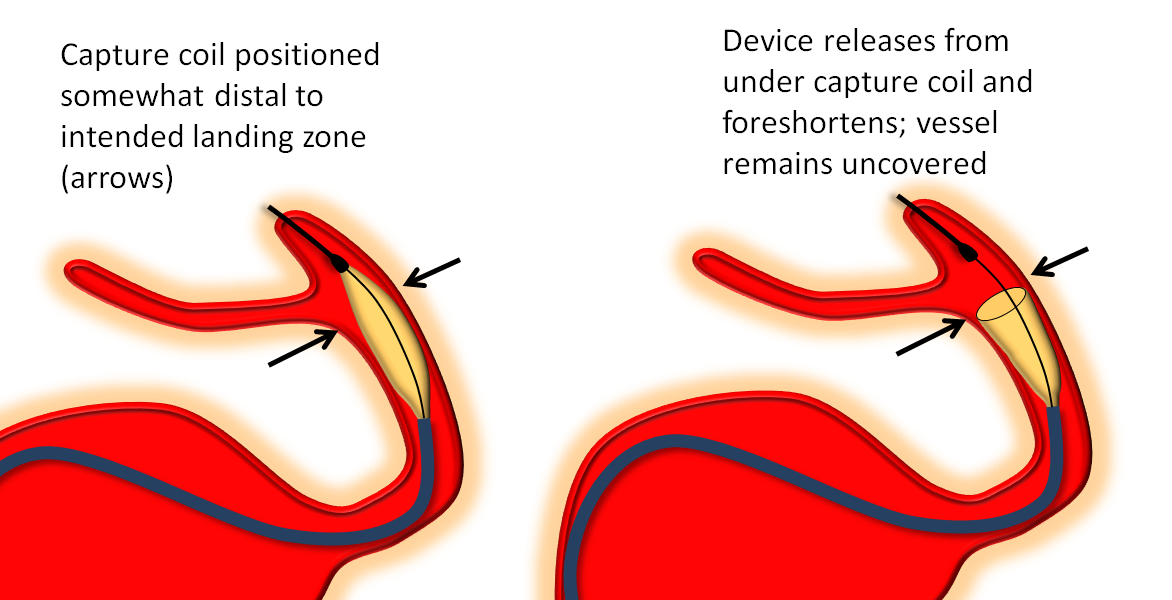
Here is a detail of the above movie, with some helpful arrows:
It is substantially more difficult to control device position if the capture coil is placed on a curve rather than in a relatively straight segment. For example, proximal cavernous aneurysms can be treated with the capture coil located in the distal horizontal cavernous segment. For anterior cavernous aneurysms, practically speaking it is probably best to position the capture coil in the next straight segment — the hypophyseal / distal ophthalmic one — rather than attempting to deliver it just around the anterior genu. (t)
Unsheathing delivery wire
Once the device is optimally positioned, the initial delivery action is to unsheathe the leading guidewire by pulling back on the delivery catheter. This is accomplished by balancing forces of pushing forward the delivery wire to prevent backwards migration and pulling back on the delivery wire, as was seen in the above example. The following is another demonstration in a patient with two giant aneurysms, one of which was previously Pipelined:
Exposing initial segment of the device — more unsheathing
Although the predominant delivery action is to push, the initial portion of the device is typically unsheathed — until enough of the device opens up to allow for something to push against. This unsheathing results in a cigar-shaped configuration which is synonymous with elongation — not appropriate for later delivery stages but usually the desired initial action. About 1/3 of the expected length can be unsheathed this way, while maintaining position of the capture coil. Circumstances will dictate when to transition to pushing — for example, if the capture coil is already against a curve (i.e. anterior genu), pushing can start earlier as there is something to push against. Not infrequently, the device will pop off the capture coil during unsheathing, which is of course excellent news, as seen below.
Detachment from capture coil
A major source of anxiety is when (or whether) the distal end of the device will detach from the capture coil. The following image is a reminder of what the device underneath the capture coil looks like:
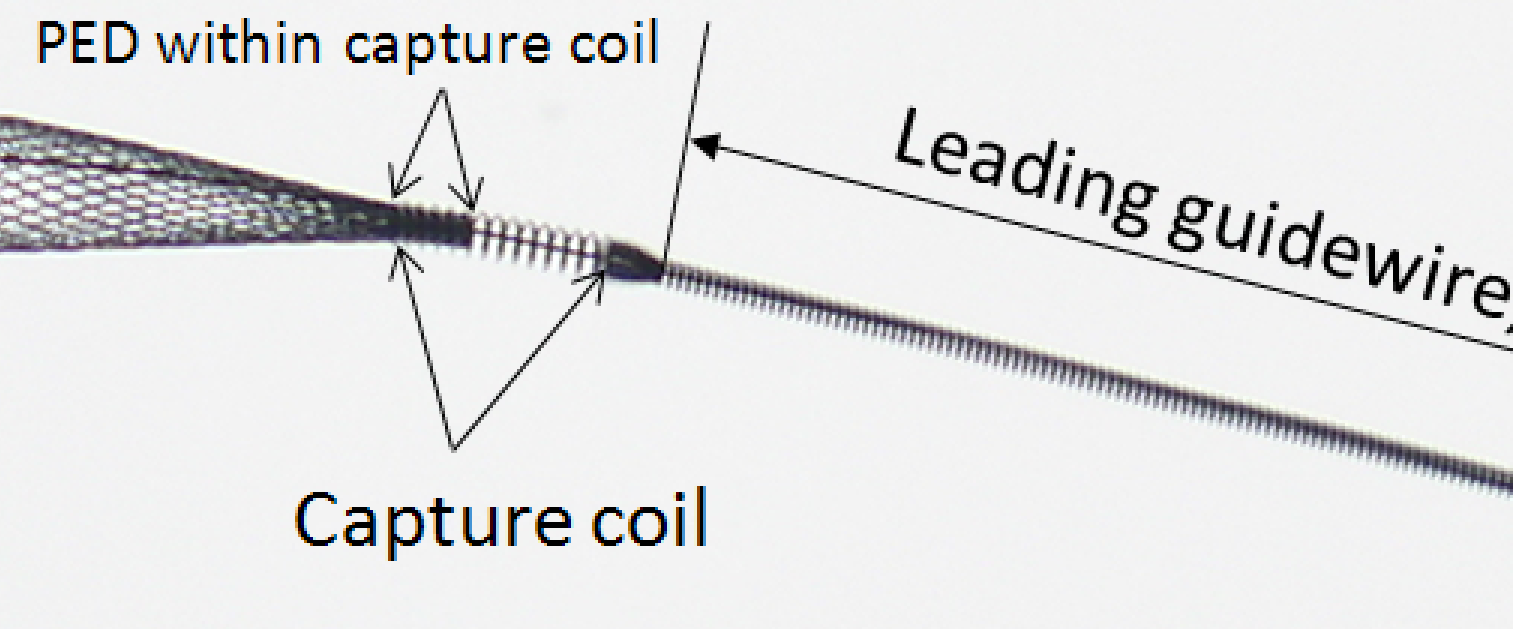
From this you can see that the capture coil is a continuation of the wind around the delivery wire which makes up the leading guidewire segment. The wire is wound in a counterclockwise orientation, and the distal end of the device is inserted into the capture coil. As the device opens during delivery, the forces acting on its distal tip create a tendency for the distal portion within the capture coil to slip from under it, i.e. to detach itself and open spontaneously. This does not always happen. Factors which influence capture coil release include device diameter (larger diameter devices tend to exhibit less robust spontaneous opening), device size relative to parent artery (oversized devices have less radial force at chosen vessel diameter and are less likely to open), location of capture coil (straighter segments tend to promote opening), mode of delivery (unsheathing results in stretched devices, which have little radial force and are less likely to open), and the amount of device underneath the capture coil (which is slightly variable).
Here are examples of relatively painless detachments:
So, if the device is not detaching from the capture coil, have a sort of checklist in mind:
1) Is the device appropriately sized to the arterial segment in question? In other words, is the device too oversized? If so, consider removing the whole assembly now, before its too late, re-accessing, and using a more appropriately-sized device.
2) Is the device stretched? Was there enough “pushing” done or predominantly unsheathing — i.e. stretching?
3) Is the capture coil stuck in a curve? If so, pull it back by pulling on both delivery wire and delivery catheter, and try again.
4) Is the distal support catheter as close to the action as possible — having your Navien or other such catheter closer to where the PED is helps translate torqueing better and facilitates detachment.
5) Is the device malfunctioning — meaning that all of the above seem to be in order, yet there is no detachment.
Here is one example of delayed capture coil release:
What to do?
1) Push and Torque — push on the delivery wire gently, while rotating the Torque CLOCKWISE. The wind of the capture coil requires to rotate CLOCKWISE. The Instructions for Use (IFU) recommend rotating up to 10 full turns — FOR A GOOD REASON. Do not rotate more than that, unless you want to be holding the end of a broken wire. In fact, if you rotate say 5 times and do not see the distal delivery wire moving, meaning that your rotation of the torque device does not translate into rotation of the capture coil, you might want to stop rotating. In this case, the torque device will usually unwind itself. In many cases, push and torque is all that is required for a device that has not already spontaneously released itself from under the capture coil.
2) Continue delivery (usually by pushing) — sometimes delivering more device appropriately against the walls, without stretching, will promote detachment.
3) Bring the Navien or another distal support catheter over the delivery microcatheter as close as safely possible and try torque and push again. Torque translates better to capture coil with more support.
4) Other than torque and continued delivery under appropriate load, there are few other tricks. Some try to wiggle the device to shake the distal end from underneath the coil. One thing we do not advise is pulling back on the delivery wire. Don’t pull back on the delivery wire at all until after the device has detached from the capture coil! Pulling back only increases the angle between the deployed portion of the device and that within the capture coil, and may bend/damage the braids — aside from possibly breaking the delivery wire.
5) For the particularly experienced user, there remains the possibility of continuing to deploy the entire device, and subsequently going back with the delivery catheter through the deployed device to “bump” the capture coil and release the device that way. If you wish to attempt this maneuver, it is helpful to bring the distal support catheter as distal as possible, to maximize support. Once the delivery catheter is advanced fully against the capture coil and the unopened distal device, rotating the torque device again may also do the trick — the rotation will translate better to the capture coil once the delivery catheter and distal support catheter have been advanced to positions of maximal support. Additional wires and catheters can also be brought alongside the original delivery catheter, either through the same sheath or when contralateral groin access is obtained, to “bump” the device open. This will work almost all the time — except when it does not — and then you are in trouble. Heroic actions in such cases might require snaring the leading guidewire from above — via the ACOM or PCOM, if such are available, and pulling on it. Just remember — none of the information on this page constitutes practice of medicine… A movie of this is shown:
6) Other than trying option 4, it may be simply best to remove the whole assembly if you feel the device is not coming off the capture coil as desired. This would certainly be the option of choice if the device is too large to begin with, or if you are simply not interested in continuing under the circumstances.
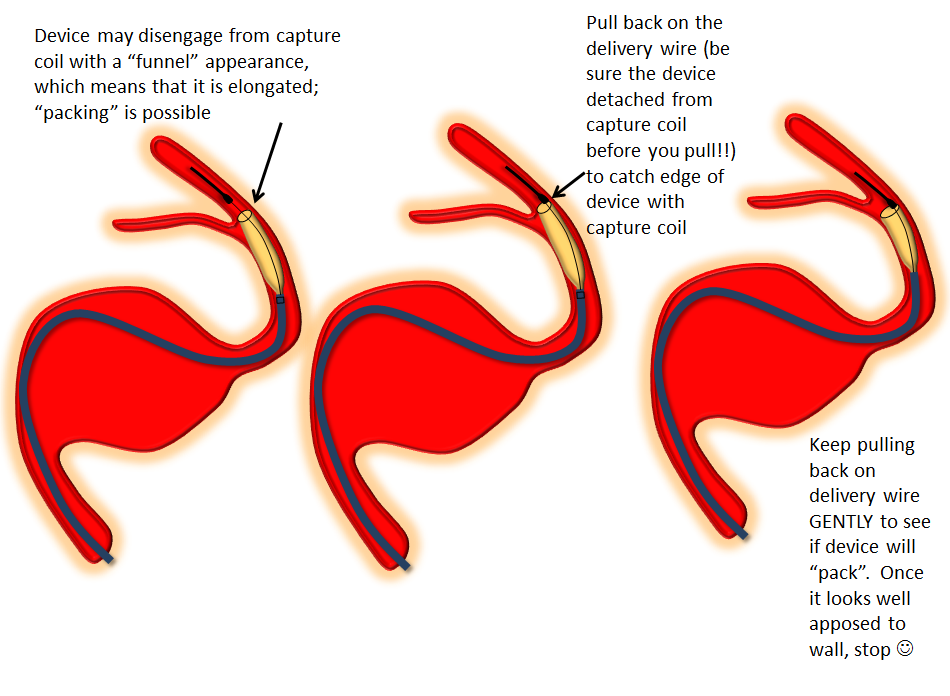
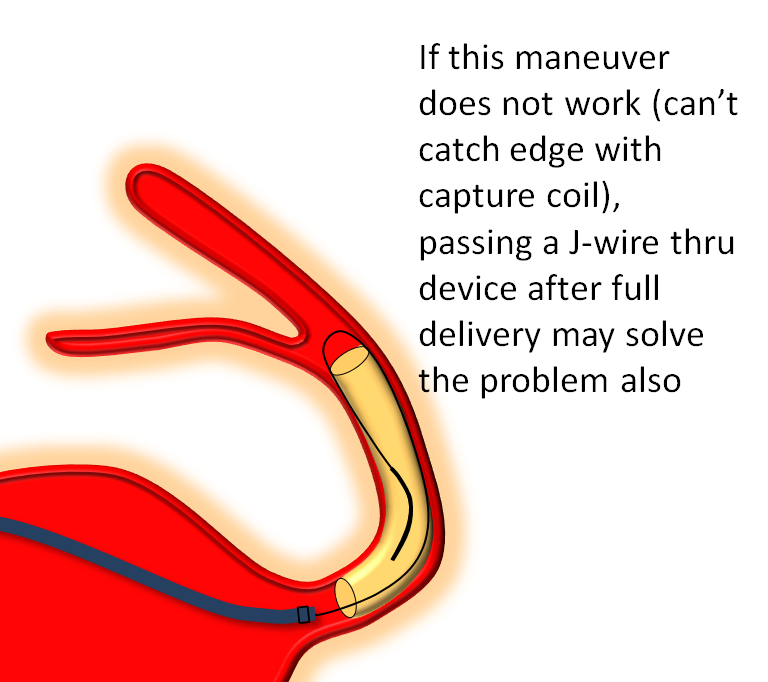
Distal edge “packing”
Devices can sometimes come off the capture coil in an elongated, funnel-like fashion. This means the distal portion is stretched. If you follow the above advice and put the capture coil over the ostium of some vessel (PCOM for example) and find that, after detachment, the device actually covers the PCOM as you were afraid it might, often the reason is that the device is funnel-shaped. It can be “packed” by catching the edge with the capture coil and pulling back on the delivery wire, as illustrated below. Make sure the device is fully detached before you attempt this…
Delivery — the right balance
It should be apparent by now that deploying the Pipeline is art as much as science. This can be used to your advantage. As an operator, you control how much you want to “pack” the device, when to add extra load, when to let it stretch a bit, etc. With increasing comfort comes the appreciation for the versatility and flexibility of deployment, consistency issues notwithstanding.
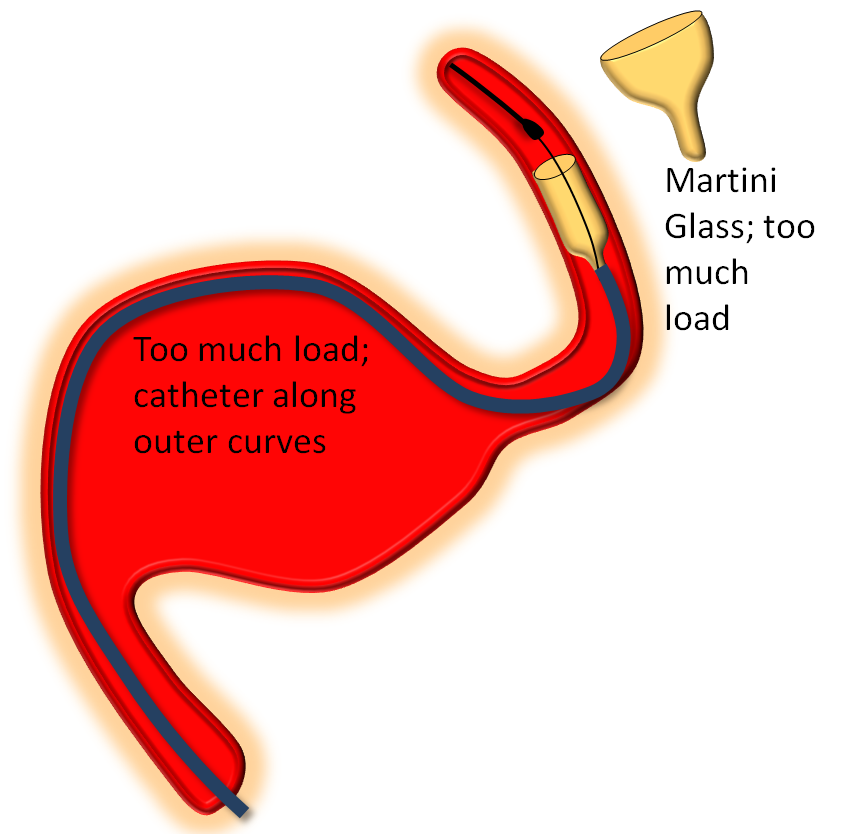
The key factor in delivery is appropriate load. Too much load causes the device to “bunch up” or even intussuscept, while too little leads to stretching. Like everything else there is a spectrum — within the “appropriate” amount of load there is ample room for variation of how much is desirable. The load is determined by the delivery catheter (and its proximal support) — pushing the delivery catheter generally increases load, and vise versa. The amount of load can be inferred by looking at the shape of the Pipeline device as it comes out of the delivery catheter, and by the relationship of the catheter to vessel and aneurysm walls, as images below illustrates. Increasing loads tend to push the leading cone of the device, which assumes a “Martini glass” kind of configuration, while delivery catheter is found along the outer curve, as seen below.
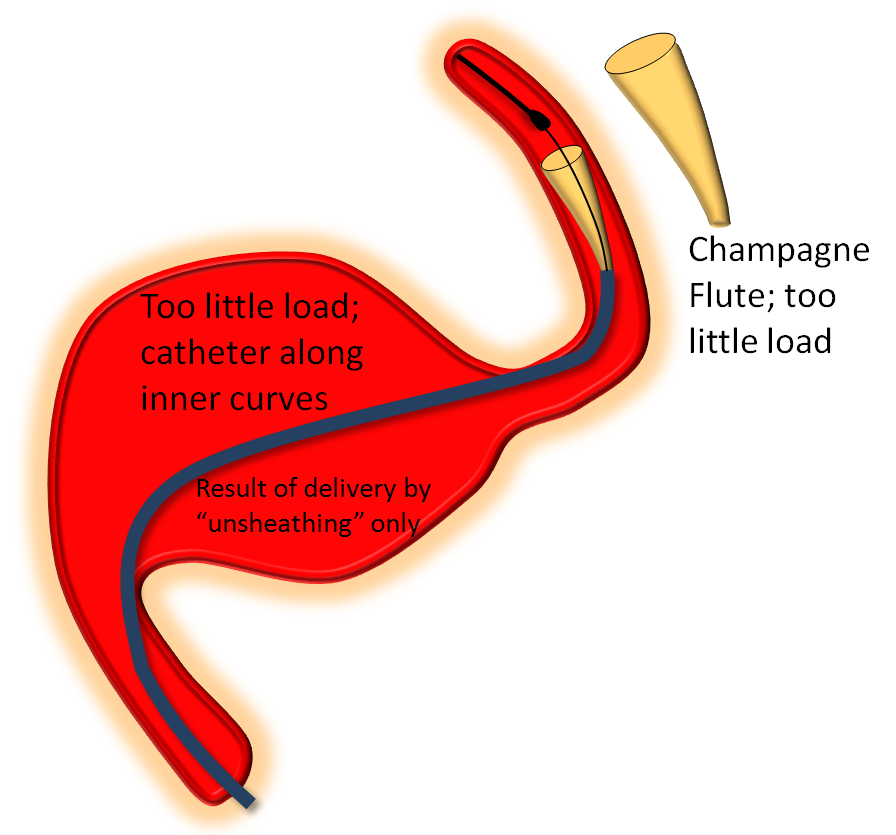
On the other end of the spectrum, stretching pulls on the leading edge which makes it look like a “champagne flute”, with delivery catheter situated on the inner curves, as also seen below.
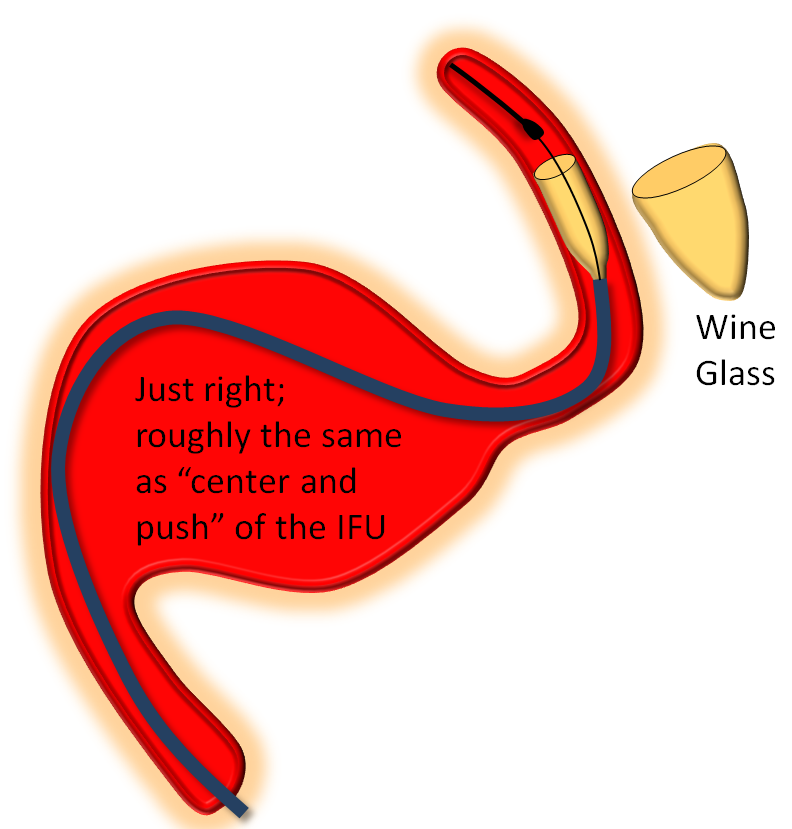
Somewhere in-between is what you probably want most of the time — a “wine glass” look, which roughly corresponds to the “center and push” look of the delivery catheter as stated in the Instructions For Use (have You read the field manual?)
Here is a movie showing examples of (generally) appropriate and inappropriate loads.
The deleterious effects of delivery by inappropriate stretching cannot be over-emphasized. By now there are several examples in the literature of exactly this phenomenon, usually under the rubric of “device migration”.
The two signs — shape of device and location of delivery assembly — tell you how much load exists in the system at any given time. How much is the right amount? — up to you. Generally, for effective pushing, there has to be at least some load present. The manufacturer recommends a “center and push” approach — meaning that the delivery wire should be positioned in the middle of the vessel and device then delivered by pushing. This is very sound advice, which particularly strives to assure that there is at least some load present in the system — not too much and not too little. In practice, however, you will find that center and push tends to produce somewhat too little load for effective “packing” of the device. By the time you are comfortable with the “feedback” from device shape and its packing based on the loads you are applying, you will find yourself ready to vary things according to your specific intentions — at which point drops of rewarding endogenous endorphins may be added to the sea of adrenaline, which is the usual state during pipeline deployment. I doubt it will ever be pure enjoyment — at least not for this generation of the device — but its getting there.
As stated above, load is varied by pushing or pulling on the delivery catheter TOGETHER with the delivery wire. The IFU advises to “pin” the delivery catheter and delivery wire together and advance both to increase load, and pull back to decrease load.
It is important to recognize that the action of device delivery, whether by pushing or unsheathing, changes the amount of load on the system. For example, pushing the device out usually results in the delivery catheter traveling back (recoil), which gradually increases the load as more device is pushed out. In other words, the more device is pushed out the more increase there will be in the overall load, all other things being equal. Therefore, particularly for longer devices, the load is typically adjusted during delivery — when and by how much depends on the shape of the device (martini glass is bad) and other factors.
It is especially critical to make sure that excessive load is not present during delivery of the last portion of the device — too much load in this final stage of delivery may “pinch off” the device and prevent it from opening properly. A comma-like configuration of the proximal end — constrained, partially opened device with an added twist — is bad news — worse than capture coil issues. Occasionally the device will do this anyway, which is equally bad news and will be addressed below. To prevent this from happening, you may want to relax the load for the final few millimeters of device deployment, as seen below:
In this example, the device is delivered under some load, and does not open immediately, being held by the Marksman. Once the Marksman is pulled back, the device springs open.
Capture coil re-capture
The final maneuver after successful delivery of the Pipeline is to go back through the opened device with the delivery catheter to re-capture the capture coil — i.e. to place the delivery catheter distal to the device to maintain distal access and to pull the capture coil into the delivery catheter. This is not always straightforward, because the capture coil has an edge which prevents it from advancing into the delivery catheter unless the two are appropriately lined up.
The first step is to advance the delivery catheter through the deployed pipeline device. Once the delivery catheter tip and capture coil are in proximity, pull on the delivery wire to see if the capture coil will get in. If it does not, it will foreshorten as it is pulled against the edge of the delivery catheter, as seen below. Here are some examples of foreshortening of the capture coil before if finally goes into the Marksman.
If you see foreshortening, DO NOT continue pulling on the delivery wire in hopes of forcing the capture coil into the catheter, for obvious reasons. It will not go in. Torque the delivery wire CLOCKWISE as you bring the capture coil into the delivery catheter to see if this will help.
The reason the capture coil does not go into the catheter is because the two are not lined up for the smooth capture. Realignment is generally best accomplished in a straight segment of the vessel so the two are not at an angle. Usually one can see during high magnification biplane fluoro whether the capture coil is aligned. In the worst case scenario, both the capture coil and catheter are removed, so that distal access is lost. To do this, cinch the capture coil against the delivery catheter so that it does not “catch” the device, and pull both out together:
Deployment of Additional Devices
If additional devices are to be placed by telescoping one device into another, an identical or larger diameter device should be used. Even when already implanted devices are felt to be oversized, one should be very cautious with telescoping a smaller diameter device into a larger one — there is no reliable way of telling where the proximal edge of the device will end up, and having a free-floating end is suboptimal.
Post-deployment
In the end, it is a very useful practice to assure yourself that the device or devices are optimally-seated, apposing the walls at both landing zones, with no endoleaks, occult in-stent constrictions or torsions, intususseptions, etc. There are several methods for doing this — such as rotational angiography with contrast injection, Dyna CT with contrast injection, and J-wire technique. Which one is chosen is perhaps not as important as using whatever you prefer consistently and comfortably. We like the J-wire method of forming the J of an 0.014 wire and going back and forth through the construct, watching to make sure the J stays apposed to the walls of the device throughout, with no areas of “catching” or constriction. Our perceived advantages to J-technique are minimizing radiation and potentially streamlining the inside of the construct. Disadvantages include the potential for “breaking” apart the construct or dislodging a tenuously positioned stent. A few movies of the method are shown below.
Here is an example of how post-processing pays off:
Packing
Sometimes it is useful to gently bump the proximal end of the device with the delivery catheter or even distal support catheter to “pack” it in, for optimal wall apposition. Gently pushing the delivery wire after full device delivery will usually bring the wire along the outer curve of the vessel, allowing the Marksman to “catch” the edge of the device and move it forward, as seen below:
To coil or not to coil?
Adjunctive coiling can be done before or after pipeline deployment. After is generally better, as you might not see the Pipe as well after coils are in. Trapping your favorite small microcatheter in the aneurysm is perfectly fine. Trapping larger catheters is up to you… Remember, no wire or coil can get through the interstices of the Pipeline — this is your only chance to coil the aneurysm.
Please remember that aneurysms are not immediately cured following Pipeline placement. Some will rupture before they are fully endothelialized, for reasons that we like to categorize as “poorly understood” — although one good reason is that all aneurysms which are not 100% closed are at risk for rupture. Undoubtedly there are complex flow and thrombus-related changes taking place in “diverted” aneurysms. For these reasons, we have a lower threshold of coiling aneurysms which show growth, possible new symptoms such as regional pain, or just seem to be morphologically threatening.
DIFFICULT SITUATIONS
The cornucopia of potential new deployment surprises never runs empty, but some things are more common than others. Here they are:
Delayed capture coil release — addressed above
Torsion
Who hasn’t seen one? I think that torsion most frequently happens when the delivery catheter (with the undeployed portion of the device in it) rotates around its long axis during deployment, creating a “waist” between the already delivered part of the device and that which is about to emerge from the delivery catheter, as seen in the pic below:
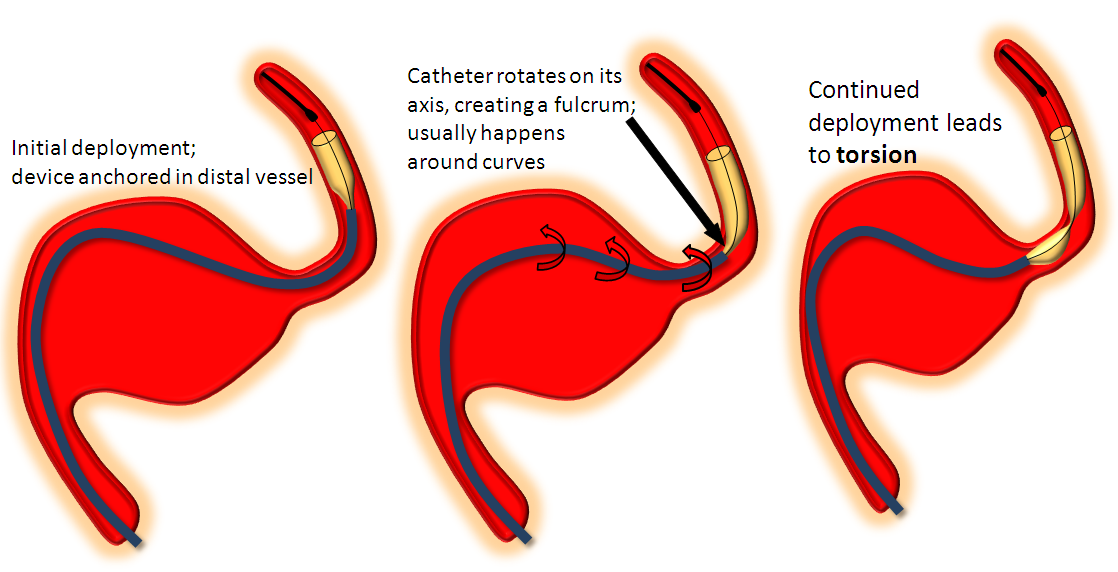
I’ve not yet seen torsion before at least some part of the device is seated against the wall, nor is it common in a straight segment. The observation of torsion occurring more frequently in longer devices is for two reasons: 1) more device means more chance for torsion 2) long devices are chosen to bridge long necks which typically involve curves between landing zones. One of the most common torsion scenarios is exactly this — bridging the neck of a large aneurysm. After the distal end of the device is deployed and, hopefully, well seated against the wall of the landing zone artery, the operator “reduces” the system by pulling back on the delivery catheter and delivery wire together to “pull” the device into the distal landing zone in hopes of bridging the whole neck with a single stent. During the pull the catheter rotates around itself (it may have taken a loop-to-loop to get across the neck, etc) and when delivery is re-commenced and more stent comes out of the delivery catheter — behold, there is a torsion. Happens all the time. Here are some examples of torsion:
Addressing torsion:
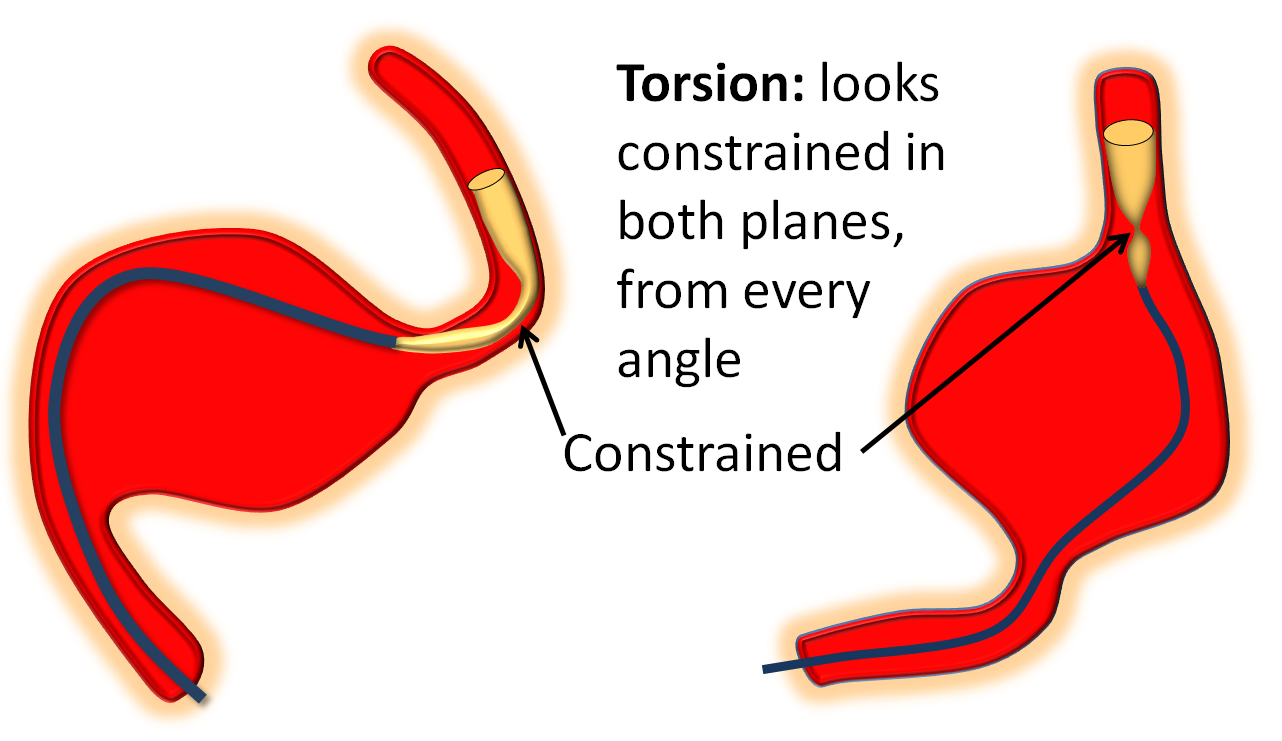
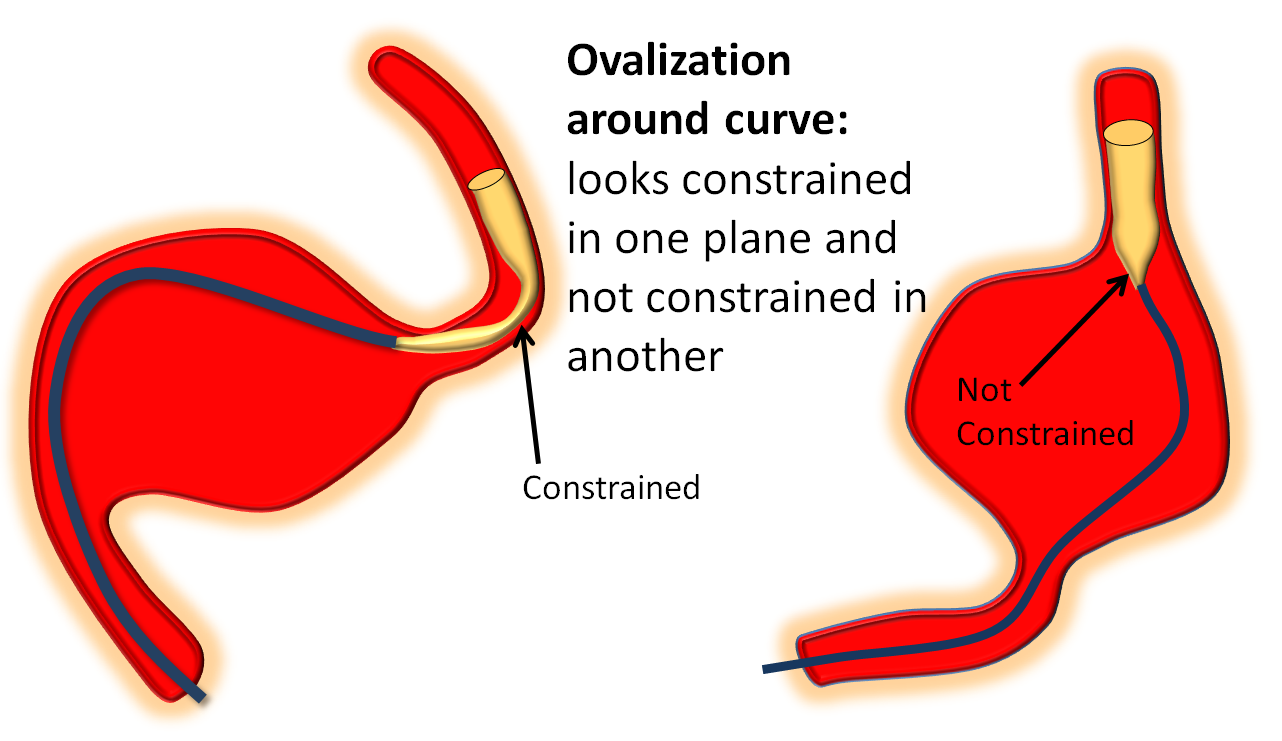
1) Recognition — torsion is different from ovalization, which is when the device flattens itself around a curve (see movie above). Ovalization looks like a waist on the device in one plane only. Torsion looks like torsion in all planes.
2) Wag the tail — wagging helps lots of things, including torsion. Basically wagging redistributes forces and loads, and promotes opening up the device in its optimal way. Wag a few times and see what happens.
3) Reverse last load/unload maneuver: The delivery catheter likely rotated on itself to precipitate torsion as a result of either reducing or increasing load applied prior to torsion. If you reduced load prior to torsion, increase load and wag, and vice versa.
4) Remove device — if nothing is working to untwist the device, cork and pull. With bad torsion, the capture coil will not go through the waist of the torsion, you may to effectively “cork” it there. As you pull, the torsion will likely undo itself when the proximal end of the device comes off the wall and has a chance to untwist itself. When this happens, cork for real and continue pulling. When you re-access and are ready to continue, consider using multiple smaller devices to accomplish the task, even it if means building a “loop” of device inside a large aneurysm. This may be the only way to go.
5) Deploy and angioplasty — if you don’t want to pull the whole thing out, and torsion is incomplete, such that it is possible to get the capture coil through it, you should be able to deploy the remainder of the device and then angioplasty the torsioned segment with a high-pressure balloon. Compliant balloons such as the hyperfrom/hyperglide family do nothing to torsion and there is no point in trying them. There are several potential issues with this approach. First, angioplasty might not succeed (have never seen it fail yet though) and you may end up with a “critical stenosis” in a man-made artery. Second, attempting to bring up balloon into a tenuously placed device (say across a large neck) may displace it so that the proximal or distal end will fall into the aneurysm (see movie above). Third, when angioplasty succeeds, it does so by breaking and twisting the strands of the device. This requires using an additional device to overlay the formerly torsioned one. You can guess what is likely to happen there… Use a short device to minimize chance of another torsion.
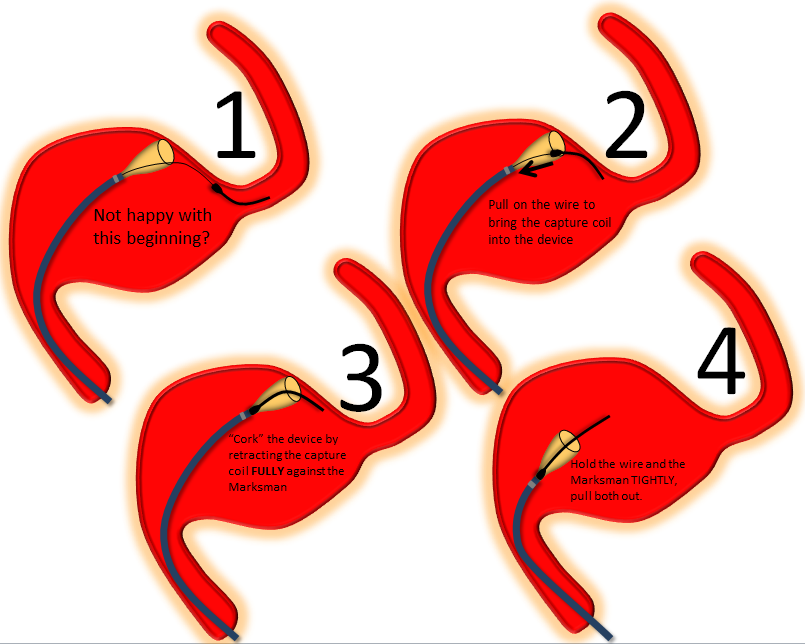
Cork and Pull
Devices which have opened distally (detached from the capture coil, partially opened) may be removed by the “cork and pull” option if something is wrong — for example the device fell back and is too proximal, has a threatened torsion, is not opening well, etc. The price of the maneuver is loosing distal access — so its generally not a great option if you have already started building a construct in a large aneuyrsm, and getting back through will be even more difficult. Here’s how cork and pull works:
Some illustrative movies:
Distal stenosis post capture coil detachment
Happens occasionally. The capture coil is off, but device is not fully open. It is relatively straightforward to address this after the rest of the device is delivered. Bring the delivery catheter through the device and push it open. If still partially constrained, use J-wire (see below) or angioplasty (compliant balloon is enough for this). Here is a movie of distal stenosis post detachment.
In-stent stenosis
May be either true constriction or a partial torsion. Most of the former are due to excessive unsheathing of the device, without allowing it to fully open. A picture of irregular, narrow device is essentially a signature of improper deployment. Prevention is the best cure. If you see stenosis developing, most likely there is not enough load. Wagging the system after adding load works well. There is often narrowing (ovalization) seen when going around a curve — even when loads are appropriate. Make sure its not a torsion, keep deploying until the device comes around the curve, and wag, wait, and wag until it opens, which is almost always.
Occult in-stent stenosis can also be discovered, if not by means of visualization, then by J-wire postprocessing, which was already shown above. The same movie of addressing in-stent stenosis is shown below:
The “Lazy” Device (non-opening)
Occasionally, pushing device out under appropriate load does not produce expected opening. All factors being accounted for, this is some kind of device issue. The answer, again, is the same — go slow and wag — works nearly every time.
This device simply refuses to open:
Ovalization around curves
The device will predictably ovalize somewhat when going around curves. This is not a major problem, so its important to stay calm and not mistake it for torsion. The difference is that torsion looks like torsion (“hourglass” from all angles) while ovalization looks like flattening in one plane (usually in lateral around the carotid siphon), while the AP looks good. The key is to GO SLOW! Please don’t be like those operators who think Pipeline delivery is a Western gunfight. Vary the load, within reason, and wag the tail. Chances are the ovalization will resolve. Sometimes it helps just to keep going and push more device out until you are again in a straight segment, then wag tail, and device will open. Here are some examples:
Typical stubborn ovalization around the curve, being addressed (ineffectively) by wagging the tail. The problem is not the curve, but the initial ascending cavernous segment (which some call “lacerum”), where the device is not fully opened. Persistent wagging eventually does the trick.
Proximal Opening Failure
Happens occasionally, but when it does, it is seriously bad news. Here is a movie of proximal opening failure, despite appropriate loads, etc.
As seen above, the device comes out with proximal end constrained, and sometimes twisted to the side, like a “comma” “,” sign. Sometimes proximal stenosis is a result of having too much load on the system as the final part of the device is delivered. We usually relax load and unsheath the last few millimeters of the device inside the delivery catheter, as seen in movie below:
If proximal stenosis happens anyway, what to do depends on how bad the situation is.
1) Wagging the tail: helps lots of things. The delivery wire inside the stent, by wagging, contacts the inside of the stent, and may get it to open fully.
2) Bumping with delivery catheter: sometimes “bumping” the device with the end of the delivery catheter is enough to make it open. GENTY, bring up the delivery catheter and apply some pressure on the end of the device (see above movie). If this does not work after several tries, don’t continue or you may bend the end further.
3) Angioplasty: If the constriction is large enough to admit the delivery catheter, go through, capture the capture coil, and place you delivery catheter distal to the stent. From this point, you have many options — such as placing an exchange-length wire and bringing up a balloon — which in this case may be a compliant type — to expand across the area of narrowing. High-pressure balloon will work for sure.
If the stenosis is severe, and the delivery catheter is not going through, DO NOT REMOVE the distal guidewire. Try to maintain access! Trying to open up the constriction with the capture coil by pulling through the stenosis may work, but if the distal delivery wire falls out altogether, you will have a critical stenosis with no good way to get back in. Options are:
1) Removing delivery catheter while maintaining the guidewire inside — requires letting the entire delivery wire go into the delivery catheter as you pull it out — pushing some saline through the delivery catheter to maintain pressure on the wire as you remove it helps. You can also cut away the delivery catheter around the wire in sections. Once that is done, a 4 mm gooseneck snare is placed AROUND the delivery guidewire, advanced to the device, synched, and device removed.
2) Access from above — if there is a way from above (PCOM or ACOM), then second groin stick, followed by access from above and balloon angioplasty (compliant balloon is enough) works. Do not pull on things too much when coming from above — risks injury to circle of Willis. This method is also available if proximal access has been lost. I would suggest that, if you are in this position, and think the ACOM or PCOM is large enough, you should consider doing a balloon test occlusion of the artery with the problematic pipeline. There are as many BTO protocols as neurointerventionalists. We typically do BTOs asleep, and rely on angiographic appearance to declare passage or failure; I assure you that our results are as good as awake hypotensive challenge and similar maneuvers. This is a minority view, but it has the advantage of allowing us to have more comfort with BTOs under circumstances of anesthesia. If the patient has an apparently sufficient circle of Willis, consider the potential disadvantages of access from above in terms of risks to the contralateral hemisphere — perhaps the better part of valor is to sacrifice the parent vessel.
Nothing is working — proximal access lost, from above is impossible, BTO a failure… Options are bringing in an emergency proctor or your friendly pipeline specialist, perhaps a bypass and takedown if sufficient expertise exists, or continuing with stent removal attempts. There is also the possibility of waking up the patient, and maintaining him/her on double antiplatelets and heparin for a week or two — devices with proximal stenosis have been known to open partially on follow-up angio — at least enough to allow for the possibility of balloon angioplasty. Alternatively, flow reduction from unopened device may encourage growth of circle of Willis or other collaterals, thus allowing for vessel takedown at future time. It is probably best, if you are in this situation, to keep heparin on as well as antiplatelets, in proportion to the degree of flow reduction.
Hemorrhage: perforation, fistula, etc.
Managed on individual basis. The first step is to recognize one. Slow bleeds are subtle and may not produce obvious vital sign changes, as seen in images below. Notice relatively subtle opacity over the posterior Sylvian fissure (A, white oval) on an ICA injection, with corresponding microinjections (C,D,E) showing a small extravasation (arrows), which produced no small amount of blood and contrast in the subarachnoid space on this Dyna CT (B). The devices were already delivered, and so choice made to close branch with coils (F). Patient was recovered fully after 1 month (initial weakness).

If a distal branch is injured by the guidewire or catheter, it is probably best to close it if this is clinically feasible to avoid the risk of delayed re-hemorrhage. CC fistulas are unlikely to close with Pipe alone and will likely require coiling or some other treatment.
Leaving in a misdeployed device is usually not advisable. All reasonable effort should be made to safely remove, plasty, or otherwise fix misdeployed devices. Sometimes there is simply nothing that can be done to fish out a device. In these cases, parent vessel sacrifice is probably the best thing to do if there are sufficient collaterals. If not, the patient may be maintained on antiplatelets and heparin to allow for growth of appropriate collaterals. Consideration should be given to arranging for patient transfer to your regional facility with maximum expertise in dealing with these issues.
POST-PROCEDURE CONSIDERATIONS
Anti-platelet management: We have not had a single in-stent thrombosis in the anterior circulation after starting to measure P2Y12. Further discussion is outside the scope of this page.
Follow-up in our group is same as in PUFS — a 6 month angio, unless clinical considerations merit an earlier study. The next follow-up is a 12 month catheter angio. We prefer 3 and 5 year catheter angiograms to CTA. We learn much more about reasons for the occasional incomplete occlusion by doing catheter angio than via any other modality.
Mass effect symptoms respond variably, depending on nature, severity, and duration of symptoms. Not infrequently the symptoms worsen before they get better — likely acute intra-aneurysmal thrombosis and inflammation, followed by aneurysm collapse. Cross-sectional, in addition to catheter angiographic followup of all patients with mass effect symptoms is essential. Aneurysm enlargement in the face of apparent angiographic cure is lack of endothelialization — and nothing else. These cases need more stents — and more than a few — before its too late.
Pain is the rule in certain locations — cavernous especially, followed by posterior fossa. Likely due to aneurysm thrombosis, it usually develops in subacute fashion, and is usually good rather than bad news. A short course of steroids works great, in addition to other meds. Pain typically lasts from a few weeks to several months. However, if pain develops or recurs after some time of pain-free interval, say several months, this is reason for prompt imaging, including cross-sectional, to evaluate for possible growth of aneurysm sac, even if angiographically the aneurysm seems “closed”.
Follow-up angiography — persistence of aneurysm
Our rate of 6 and 12 month non-occlusion remains identical to PUFS, as is our average stent number per case. Those using less devices will find less cures. The most important thing to make sure when facing a persistent aneurysm is to exclude an endoleak. Lack of device apposition at the landing zones leads to endoleak, which keeps the aneurysm open. Look carefully at unsubtracted images and take multiple high-magnification oblique views. If there is no endoleak, we usually wait another 6 months, and if the aneurysm remains open, add more devices.
We will routinely obtain cross-sectional imaging for patients with angiographic “cure”. More and more reports are emerging of aneurysm sacks which continue to grow despite apparent angiographic cure. This means that the device is NOT endothelialized and the aneurysm remains open — as further proven by even more disturbing reports of “recanalizations” following apparent cure. The message, again, is that there was no cure, only thrombus, and more devices need to be placed, before too long…
When an artery emerges from the aneurysm (neck or dome) such as the ophthalmic, one of two things is likely to happen: either the ophthalmic will stay open, together with the aneurysm, or both will go down. The artery usually closes slowly (like an endovascular Silverstone clamp) and the external carotid takes over with no issues: about 20% of our ophthalmic arteries go down on follow-up, with one case of amaurosis and no cases of any vision loss, partial or complete — including PUFS cases with dedicated perimetery testing. In the posterior circulation, the situation is more difficult, as all arteries are eloquent. In any case, if you feel that the aneurysm is kept open by an artery arising from the aneurysm, a judgment call is required.
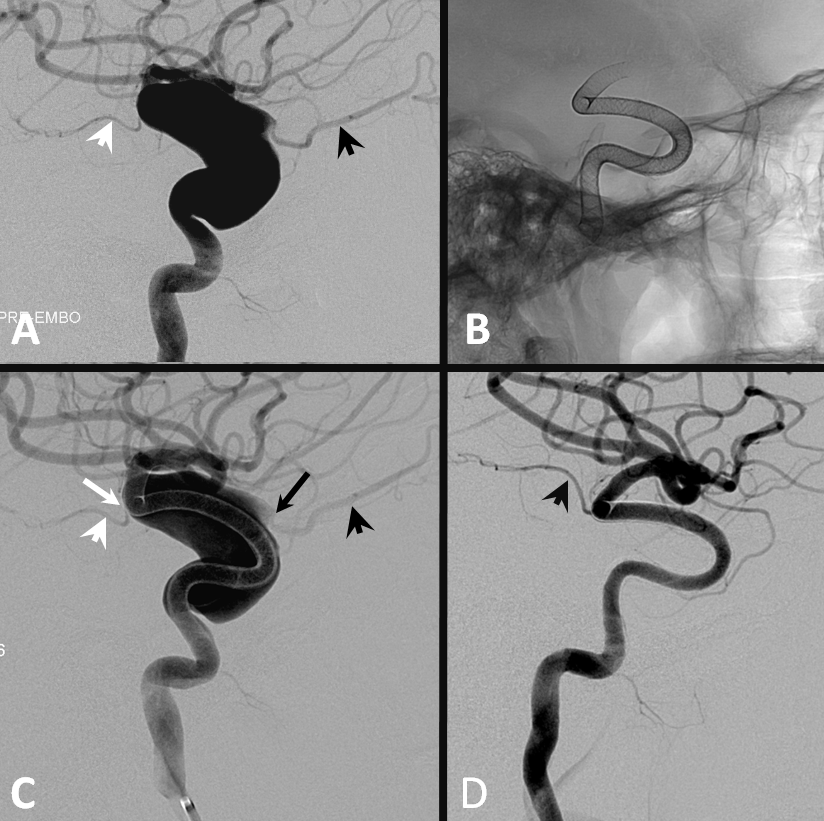
Below is an illustration of exactly such differences in a patient with a huge fusiform trans-segmental aneurysm (A). The ophthalmic (black arrowhead) arises from the “dome”, while the anterior choroidal (white arrowhead) is situated on the tapering segment of the “fusiformity”. Both are multi-covered by the Pipeline construct. The ophthalmic ostium is away from the device (black arrow), while the ostium of the choroidal is purposefully situated immediately adjacent to the construct (white arrow). Eight months later (D), the ophthalmic is closed (asymptomatic, ECA reconstitution), while the choroidal continues to fill.
Occasionally collateral reconstitution can be seen in other scenarios, for example in this patient with a giant MCA bifurcation aneurysm, with a small inferior division coming from the neck. Two PEDs produced tremendous flow diversion, with immediate non-visualization of the temporal lobe. Injection of the vertebral artery shows robust collateral reconstitution of the inferior division all the way to the ostium. Case courtesy of Dr. Howard A. Riina
Conclusion
Pipeline is a very complicated device in its first incarnation. Mastering it requires patience and humility, at all levels of expertise. Going through the first 10 cases without some kind of issue is unlikely, so that all members of the team must be mentally and technically prepared for issues. It is extremely helpful to inform your team of such possibilities ahead of time. Try to neither love or hate the device after first 1 through 5 cases, but go slowly and listen to the local experts — proctors, reps, specialists…
Acknowledgements
Everything I learned about Pipeline can be traced to the influence of two great teachers– Dr. Peter Kim Nelson and Dr. Tibor Becske. Whatever contributions I made have been influenced by their vision. I am also deeply grateful to Dr. Howard A. Riina for his guidance and support. This page would never come about without the support of our fellows Eytan Raz and Daniel Zumofen. For the purposes of disclaimer, views and opinions expressed on this page are entirely my own.
Disclaimer
I, Maksim Shapiro, am a Pipeline proctor and per diem consultant with Covidien, the manufacturer of Pipeline. No financial or other support whatsoever was provided by any legal entity, group, or individual towards creation of this page, or www.neuroangio.org as a whole. Pipeline devices featured in ex-vivo images above were donated by Covidien for general training purposes, and related projects. See Disclaimer section for general disclaimer information.
Questions, Comments, Inquiries
May be submitted via the Contact Us section or by calling the office at 1-212-263-6008